Nationalsolo
-
Posts
3,677 -
Joined
-
Last visited
Content Type
Profiles
Forums
Events
Everything posted by Nationalsolo
-
Hi Further to this topic. You can make a circular mask. This has worked entirely successfully....... Create a circular mask...... For this you need a 16:9 image of a circle. (or an image with the same AR of your clip.) I used Windows DRAW to do this and loaded it to VP... The image was created as a 1920 x 1080 jpg. Next step is to create a mask around this shape...... Click FX and then Add Effect Mask .Drag the mask outline regularly out to the edge of the circle until it is even all round. Enlarge the preview window to ensure all the points are regularly spaced and the mask conforms well with the shape. Save the effect as a Chain Template by clicking the blue cassette tab. Give it a name and it will now appear in the effects Template section as a circular mask. This procedure only needs to be done once. The circular mask can be used now at any time. Close VP Use this mask as I described in my earlier post to create a Closing Circular Transition. Nat


-
Hi VP version 7.5 beta Here, everything works OK but even if I don't connect a microphone and try to record Audio, VP goes through the motions and simply records a blank "My Audio" file. I see no message asking me to connect a microphone. Try this.....Don't plug any microphone in and use capture from "Default Sound in" See if you get a blank file. If you do then plug the mike in and try it again. Nat
-
Hi Video 1 on Track 1 and Video 2 on Track 2........... Video 2 on Track 2 has been split and unwanted segments deleted. The timeline should then look at bit like this...... Video Track 2 now has the "cutaway" segments that play over (overlay) the complete video on track 1 Nat


-
Hi If the sequence preview AR is set to anything other than Match content then VP may stutter during timeline playback with "Building preview" messages as the display presumably has to be readjusted to the selected parameters as the sequence is played. The message is often of quite short and regular duration. e.g. Here, setting it a Match Monitor or 4:3 a short sequence flashed the message every 3 seconds Setting this to AR 2:1 the same sequence flashed the message every second I personally think it is better to keep this preview control set at Match Content. Nat
-
Hi Yes..It is a bit phaffy. However it can be made just a little easir regarding centering the mask. Clip 2 on Track 2 Clip 1 on Track1 Place the polygon mask on Clip 2 and drag the corners out to cover the image. Mask inside Add Transparency of 100% Add Scale effect Click keyframe for start of the clip Slide cursor to end of the clip (or end of Clip1) Add Scale effect In the preview scale control, drag the handle that is diagonally opposite the black dot back to the dot. This shrinks the mask down to zero and keeps it in the centre. Create keyframe 2 This is bit quicker than trying to find the screen centre by trial and error. A set of predefined mask shapes would be very useful for this process Nat
-
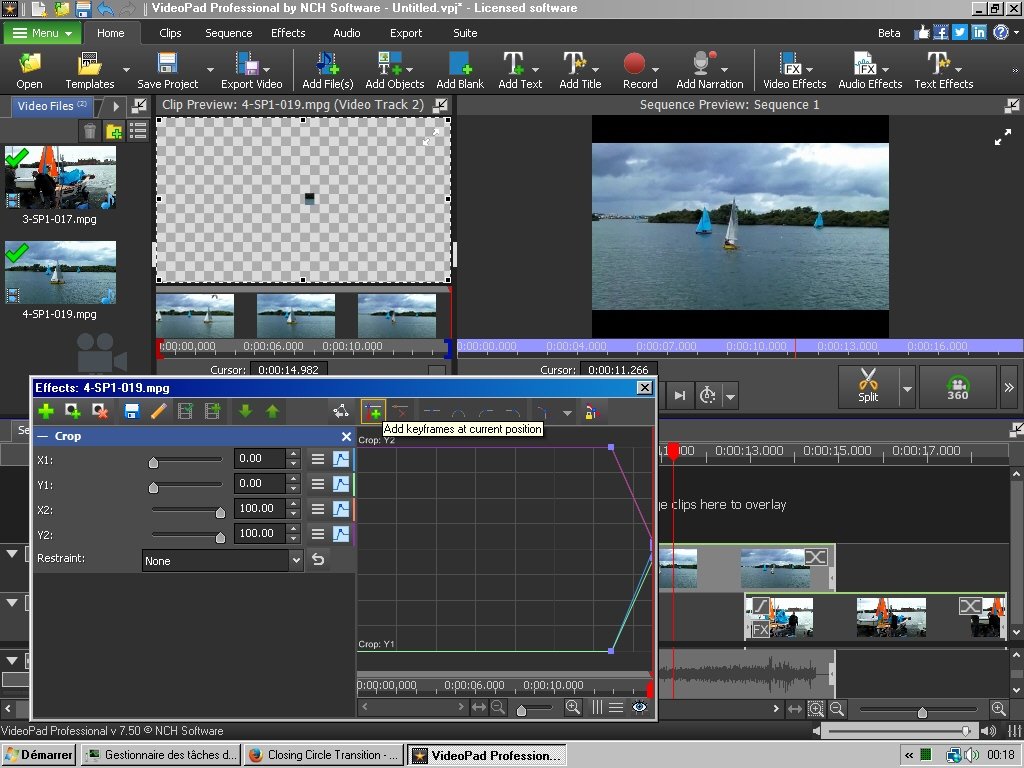
Hi In short no to both questions. So put in a suggestion to NCH. For a circle it may not be possible since it has to start outside the frame. However, it is possible to create a closing rectangular transition as follows...... Proceed something like this Place Clip 1 on Track 2 Place Clip 2 on Track 1 Overlap the clips by dragging Clip 2 to the left a suitable distance under Clip 1 Click the FX for Clip1 Select the Crop. effect This places a rectangle around the preview frame with corner handles Move the Effects red cursor line to the right. Monitor the movement with the timeline red cursor line as they move together. Stop when the timeline cursor reached the start of Clip 2 Click the Keyframe tab to set the crop position. (There actually won't be any cropping at this point.) Slide the Effects red cursor line to the right. Stop when you have reached the end of Clip 1 Now reduce the size of the crop rectangle to as small as possible keeping it central (or reducing it so it finishes on any desired position) This has to be done by guesswork. Click the keyframe tab again to set a second keyframe. The appearance of the various elements should now appear something like this....... Playing the sequence should show a rectangle starting at the outside of the first clip and gradually reducing in size to reveal clip 2. I have suggested to NCH in the past that it would be quite useful to have other shapes for crop and mask that included ovals and circles, and a way of automatically centering the outline if required. but it's never come about yet. Nat

-
Hi It's fairly straightforward. The clips will be on different tracks, each with an FX box. The clip on the upper track will overlay the clip on the lower track On Track 2 (upper track) click the FX and add a Crop effect. You can keep the AR the same or make the crop any ratio you wish. Monitor the result in the Sequence preview window. You should now see some of the lower video track. Click the FX in the Track 1 (Lower) video and do the same. You can move either of the cropped frames to another position by adding a Position effect to them and then dragging them to where you want. Nat
-
Hi B Can't get your mp4 to play but here's my observation..(Recent observations have been a bit awry!!! However).... I find this a bit odd. I have just made 2 gif images, one with a transparent BG. (Just to see if there was any difference) I loaded both to VP. Each of these "images" went into the Video Clip bin. So apparently not seen as images. Both had a duration of 0.1 seconds. Same on the timeline......i.e. VP sees them as single frame clips... Note that these are exactly the same type of .gif image I use to make my animated examples for talks with Microsoft .gif Animator. (I should point out that those are a little more complex than just a red/black circle!) Now....an oddity. You mention I could possibly make them longer by changing their speed) .......as they are seen as .1 sec Video clips. So basic "clip" has a duration is 0.1 seconds as stated.. OK, Now If I change clip speed to 50%...... It correctly(?) shows .2 seconds Click Set ....and timeline greys out!!! ...... ...and the 0.1 sec "image/clip" now becomes -596hr 31 min 23.648 secs So a few things wrong there! Next oddity is that I have a test .gif that behaves as a normal image like yours...Seems not all .gifs are created equal! I'll download some others and try them out. Nat


-
Hi B Oh! Yes your right! ...Sorry....I'll edit that bit. (Getting to be a habit!) Nat
-
Hi ".... Is there a way to trim the start of a video and trim the audio at the same time? ..." If the Video and the Audio are the same clip...i.e the Audio belongs to the clip... It's linked.... Move the Red cursor line to place where you wish to trim. Release the cursor line Click the scissor icon that you see. Both Video and Audio tracks will be cut. Right click the section to the left of the cut Select Delete from the menu Re-click the gap produced Select Close Gap in Track If the Audio is a separate audio clip..or it has been unlinked.... Move the red cursor line to the point where you want to trim In the Sequence Preview window click the small down arrow next to the Split button Select the tracks you wish to split. All/a specific video track/a specific audio track etc. Moving the audio using the mouse can be quite exact if you zoom into the tracks using the mouse scroll bar (if there is one) otherwise use the Zoom slider under the tracks on the right. The audio track must be unlinked for this to work If that is not exact enough move the red cursor line to the exact place you want to start the audio. You can step along a frame at a time if required. (Press the II< or >II buttons.) Now drag the audio line (unlinked) along the track to the cursor line and it will "jump" into place at the cursor. A specific point in the audio will need to be checked by dragging it to the cursor line and then releasing it. In this case the mouse arrow should be at the cursor line. Nat
-
Hi In the S/T editor you will see your clip on the right. As you write the S/T text, the area in the clip where it will appear will brighten and you will see red START and a blue STOP markers. Your S/T will appear between these points in time. These can be dragged to position/extend/shorten the time the S/T is present. If you now click the Add (Green cross) your S/T will be listed in the editor with the Start and Stop times and you can now start another S/T If, however you start a new S/T without moving the markers, the new S/T will appear in the same place and overlap the old S/T Once you have clicked the Green + in the editor the S/T is saved to the timeline and will appear at the designated place when the sequence is previewed. In effect S/T appear on the timeline as you create them. You can also save them as an SSA or SRT file that can be loaded back. Nat

-
Hi Do many people use .gif images in their projects? VP does not handle this type of file correctly as it interprets it as a video clip of a single frame. Consequently you cannot extend the duration and this makes it virtually useless. Unfortunately .gif images can be created with a transparent background making them very useful for logos and "object" animation where movement over a background is needed. In VP, although the background comes up transparent, you can't do anything with them since as I said, they come up as a single, unalterable frame clip and not an image which is a great pity. Why not, you may say, convert them to ,jpg format. Well in short, the transparency would be lost which is one of the main points of usefulness with gifs. It also means you have to use a green screen to take out the now, white or black background and the borders are then never very good. Transparent background png images don't (at least here) show up correctly on my PC but DO load to VP. Anyway, the Draw program I use to generate .gifs won't give a transparency to pngs although it will export them. Animated gif files (which I use a lot in illustrated talks) DO play in VP but as they are constructed with single images, timed individually and several similar images placed one after another often being used to create suitable pauses in the animation, they again, don't play properly in VP as each image is still a single frame of around 0.1 second. You can convert then to .avi but, again the conversion does not create pauses in the action properly where a single gif has had its duration set in the creator program. i.e. it has been given a duration of, say 2 seconds but VP makes THAT image 0.1 second. If you have worked with .gif files you will know what I mean. Any opinions out there? Nat
-
Hi Which version of VP is this please? VP 7.39 shows this for that option screen.......and it's not white either..... Nat

-
Hi Do a Google search for Arabic fonts. Apparently there are many to choose from....... https://org.uib.no/smi/ksv/ArabicFonts.html Once a font is installed in your PC font folder it should list in the text editor font list although if it can be used as such I doubt. i.e. No of characters, keyboard being used L-R parsing etc. Probably the easiest way is to use Google Translator. Enter Translate into the browser search box. Enter the english text on the left and the Arabic text should appear on the right......... Now select and Copy the translated text and paste it into the VP text editor ...... It can now be placed as text on/in your project....... Of course, not being an Arabic speaker or reader, I have no idea whether this reads.."The cat sat on the mat" or "mat the on sat cat The" or even..."tam eht no tas tac ehT" It might even be complete gobbledygook. but it illustrates a method that might be used. (It has worked for Hebrew text) Nat


-
Hi Are you referring to CAMERA SHAKE or some other visual effect? If the original clips from your camera, imported to VP are shaky then that is nothing to do with VP. A steady support when filming is the obvious answer to this. If this, in fact is the case then apply the Stabilize effect to your clips before exporting your edited video . (It is unlikely that VP will produce a shaky export clip) The stabilizing process can be time consuming. There are two ways to do it. 1) Load your exported video to VP Right click it in the Clip bin Select the option Stabilize Video. VP will process the video, make an copy in the default save folder as set up Options and replace the file you have placed in VP 2) Load all the project clips to VP Right click each one in turn in the clip bin and select the Stabilize Video option. Check the Quality of stabilization desired. and click OK. The selected clip in the bin will be replaced with a stabilized version. If you have already placed the clip onto the timeline it will be replaced with the stabilized clip. Copies will be stored in the default folder set up under Options Edit your project with the stabilized clips It would be interesting to see a short example showing the effect you are getting Nat
-
Hi Sounds as if there is bug in the S/T text editor.... What SHOULD happen (at least in 7.39.. (Position of S/T set at bottom of screen) Open ST editor and type a line of text...Enter NOT pressed (Note position of vertical flashing cursor line.)...... First line of Text appears at the bottom of the screen as expected. Press Enter to start a second line of text........ Text line jumps up the screen and flashing cursor goes down to start of second line of text. Enter second line of text...... Enter NOT pressed.....(as before)....... The second line is entered at the bottom of the screen. Flashing cursor remains at end of the second text line in the editor. ...and so on..... NO EMPTY LINE IS CREATED AT THE BOTTOM OF THE SCREEN UNLESS ENTER IS PRESSED AGAIN. Pressing the Add green cross now places the S/T in the List box with its timings and clears the edit area...... That's how it should work. (At least that's how it works with 7.39 here) However....In some circumstances, particularly if you have deleted a line of text with the <-------- key (Delete); the effect of using ENTER earlier which creates a new line can be left behind. I know that might sound odd, but it can leave the editor apparently empty of any text apart from invisible new lines. Any NEW text entered arrives at the top of the editor as expected but appears on screen two or even three lines up! The way out of this it seems is to repeatedly press the <------ (Delete) key to delete not only the new text BUT ALSO the invisible New Lines below it. Nat


-
Hi Your short mp4 clip played OK here both in VLC and when loaded to VP. There were lots of artifacts suggesting it was a copy of a badly registered VHS tape being filmed ..but these do not originate from VP... Nat
-
Hi Out of interest.... As soon as the line/or two lines moves up leaving the space, what happens if you press the <.-------- (Delete) key? Does the text now drop down to the bottom of the screen? and...With the empty line present, where is the flashing cursor...at the end of a line or below the last line? Nat
-
Hi The regular thin white lines you see on the audio track are not meant to be there. AFAIK the developers used them as timing marks for testing. You may have downloaded a Beta version where these were present before the files on the server were updated. Try a new download with the latest version.. The latest version is 7.39 Nat
-
Hi Do a search for specific programs. Depending on the watermark...size; density; position etc. it might be possible to disguise it in VP. As a simple example here is a clip with a watermark top right... You could try this.... Click FX and add a Polygon mask close around the watermark..... Check "Mask inside" is ticked. Click the Green + and add a Blur effect. This will blur the masked area making the watermark much less conspicuous...... OK...It's not PURRfect but in this case it is reasonably effective. A lot depends on the actual watermark. Nat


-
Hi Text Colour..... Put a clip on Video Track 1 Slide Red cursor line to position where the text is to appear Click the Add text tab Select Simple text Overlay. This opens the Text Editor....... This will show a default text (usually "Title Text" ) at the top of the text entry area...... Above this to the right are controls for: Left/Central/Right justification and Top/Middle/Bottom position for the text and a selection box for Scrolling the text in various directions. Above left are the controls for Font/Style/Size and Colour. of the text and underneath this is a tick box to add a Shadow to the text along with the Colour of the shadow, THE TEXT MUST FIRST BE SELECTED BEFORE THESE CHOICES BECOME ACTIVE. The central section has a Tick box to Outline the text; a slider to set the Outline thickness and a box to set the Colour of the outline, Again THE TEXT IN QUESTION HAS TO BE SELECTED BEFORE THESE CONTROLS ARE IMPLEMENTED. Below the outline control is a selection box for setting the Editor background colour ; the Text background colour and the background colour of the Text image itself and also thre %Opacity of the background. These are the basic controls. Changing the Text colour or other Object clolour (backgrounds/Outline/Shadow etc. Select the text that you wish to colour (or click the repective colour box) Click the selected Colour box This wil open the Edit Colours screen....... This shows a Hue Table in which there is a small white circle. To the right of the Hue Table is a vertical band of hues with a white moveable arrow. This can be moved up/down to select a different Hue table. The image above shows this arrow is in the Yellow region and the Hue Table therefore shows Yellow hues going from Black to Yellow...Black to White and White to Yellow. i.e. Yellow with varying amounts of Black and white. Sliding the arrow up and down will change the Hue table to that of the selected colour... e.g. Blue... Below the Hue table are sliders that alter the degrees of Colour Saturation for the Hue chosen; the degree of Paleness/Darkness of the hue; and the balance of each of the the three primary colours of the hue selected. Play with these to see the effect produced. Right of this is a square showing the Current Hue of the text (in this case Black) and the New Hue as selected from the table allowing the user to compare the two. Right of this is a Pipette.(a Colour Picker) This can be used to pick a colour from the Hue table, or select a colour from the Hue band/ the Swatch area at the bottom or even choose a colour present in the Clip preview window. OR IN FACT ANYWHERE ON THE SCREEN. The small white circle can be moved around the Hue table to select a colour within the hue range chosen Click OK to finally fix your chosen colour - the colour labelled New (which updates as you work) The selected object in the Text Editor now will be coloured with that selection and a Swatch box at the bottom of the window will be filled with the selected colour allowing the user to pick that colour again with the pipette, obviating the need to generate the shade again. NOTE: All the colour boxes in the Text Edit screen work the same way and will allow you to Change the Colour of the text; the Text outline; the Editor background; the Text Shadow; the Full Background and the Text background The system can generate millions of colours so the choice is yours. Experiment. In short.....Highlight the text to colour or click one of the colour boxes.....Use the above guide to get a colour.........Pick a colour with the pipette or the white circle ......Click OK Nat


-
Hi Same here. Can't play you example (Old browser etc.) Also, as I mentioned, if you hit the Enter key after your last subtitle line, (and it's easy to do,) it creates an empty new line and pushes the subtitle block up by that empty line. Nat
-
Hi Simon & Borate From me....... "..... subtitles are automatically aligned at the bottom and AFAIK can't be moved or resized......" From Borate.... "...... click the FORMAT tab. There font size, color, outline, shadow, placement, etc.can be specified. .." Sorry! I was completely WRONG!! 😡 You can tell I don't use subtitles much! Nat
-
Hi Are you referring to SUBTITLES or Simple text.? I prefer using simple text. Subtitles are automatically aligned at the bottom and AFAIK can't be moved or resized. Here is a two line SUBTITLE... You may feel this is too large so use simple text... Simple text on the other hand can be placed in any position and made different sizes and colours...Here is a simple text of two lines in different colours (two reflect two people speaking) and placed at the bottom of the screen...using the text editor controls. If the text is too high the font can be reduced in size quite easily........ As simple text is an IMAGE it can be placed anywhere within the frame using the POSITION effect Example of simple text can be positioned in time by dragging the image along the timeline. Two lines can also be used where required by placing Text 1 on Track 2 and placing Text 2 on Track 3.... If they are placed in different positions and overlapped on the different tracks Text 1 will appear first followed by text 2 under it. Note that if text 1 is entered into the editor and followed by an empty new line (Just Enter) then it will jump up a line and consequently will leave a space for Text 2 to appear in. So...for many reasons I would use simple text. Nat


-

solved Combined 2D photo/film with 360 degree photo/film
Nationalsolo replied to kristiansen's topic in VideoPad
Hi "....... the photo from inside the burial chamber is a 360 degree photo, ...." OK.......but where does this navigation item come from? (YouTube screen dump) This from your version created on 7.02 and viewed on YouTube The export of your image from VP doesn't show it. (viewed in VLC) This image (from VLC) has the View in 360 effect added which un-distorts it and zooms into the centre. You can pan in any direction but only by using keyframes. The are no navigation buttons. On YouTube your version from VP 7.02 shows the info board image as a normal image BUT it has the navigation buttons and pressing these pans the image about. In fact if you just hold the YouTube cursor line down a View in 360 of the image shows up ....which is odd. I suspect that the behavior you are seeing has something to do with the YouTube viewer. Also the navigation buttons shown on the example on the web page for your camera are different which makes me think it is a property of the viewer and not VP. What do you see in VP when your camera video is loaded to VP? If it is just an image as you say it is there won't be any navigation buttons. It would be interesting to see what others think..or know. Nat