Nationalsolo
-
Posts
3,677 -
Joined
-
Last visited
Content Type
Profiles
Forums
Events
Everything posted by Nationalsolo
-
Hi OK I tried the idea of scrolling 1 line at a time into a 4 line gap. This idea actually works very well as each text can be positioned on its own track to synch with the audio However , for an even and suitable scrolling speed and regular appearence, each line of text (irrespective of its length) would need to be around 10 seconds duration with each one starting 1 second after the previous one.(i.e. Around 1 second apart.) Using these values it would require the use of 10 Tracks for the text lines.(Track 2 to Track 11) After this Track2 would be free to use again for text 11 etc. Any further text lines could then be continued at infinitum. Any number of lines of text could be used, scrolling up to a limit of 4 in screen height. It's a bit clumsy but it works. However, I am still not clear why you need a "Text Box". In my original scenario, Not the one above) Cropping the upper of two still images to leave a 4 line space is all that is required All the lines of text (any number of lines up to screen length) can easily be scrolled without any cropping and will only need threeTracks. (Track 1..The background image uncropped. Track2 the text image...Track 3 the cropped background image. Nat

-
HI Rob "... The problem is the "window" remains the size of the screen and cropping or layering only hides the scrolling text. With the text cropped to a window at the bottom of the screen, the text still has to scroll (invisibly) off the top of the screen to end the sequence. So to have the last line of text display at the end of the musical selection, the scrolling text sequence has to extend beyond the musical selection for the amount of time it takes for the last line to scroll from the visible area, off the top of the screen. ..." You are correct but note that I mentioned that you could, if that delay is a problem simply apply another text clip of the next (last?) line placed on a higher track (but under the cropped top part of the background static image.). Even though text 1 is scrolling (invisibly) up to top of the screen behind the top half of the static image, your Text2 line can be positioned so IT scrolls into view as the previous text disappears (or at the correct moment to match the audio.Also the text in my example is not cropped; it is exactly as typed into the text editor. Each line could be full screen width if needed. If you want to go to extremes then each image of a text line could be placed on tracks 2, 3 , 4 and 5 with the covering cropped background image on track 6. In this way each scrolling text line could be positioned so it starts with the audio. Worth playing with and (on paper) relatively simple. (I'll try it and see..) Nat
-
Hi That sounds a bit odd. OK..As I understand it...The first export (avi or mp4) was correct and the S/T were present.......So it's not the version you are using. So, one question is....Why, as it seems, did you reload the Video you made? If you wanted to add further clips or edit your S/T etc, you should have saved your project as a vpj file and then reloaded that. Here using VP 7.21 The Exports are complete and the vpj file reloads everything back correctly and added clips and more S/T export as expected. I can't find an error here. Nevertheless, reloading an exported clip that already has your S/T should not have made any difference as they would then have been part of the video. Any further S/T added to this video should have behaved in exactly the same way as adding S/T to any other clip. (i.e. like your first working export.) Were the S/T visible in VP when you reloaded your first exported video? (They should have been as they presumably played in your external player) As I said adding further clips and S/T to this should have made no difference. I am afraid that hasn't helped but offhand I can't see where your error (if indeed you made an error) lies. It could be someone else may come in on this. Nat
-
Hi What version of VP are you using and have you changed recently? Exported mp4 and avi here using VP 7.21 all carry the subtitles added during editing. Open the subtitle screen and check each subtitle has a place between the IN and OUT markers. If you could create a small example where subtitles do not appear and then Save it as a portable project (from the File menu) and then load it to Dropbox or similar someone will take a look. Nat
-
Hi "Confirmed here. But it appears to happen only when a fade in has also been programmed, using the f icon in the clip. With no fade in, the fade out exports. Reported." Tried this with a Fade-in and Dissolve and it worked OK here. . But there seems to be some condition somewhere where even the Dissolve on its own won't work. Try this. Image to Track 1 Text to Track 2 (automatically) Click X and add Dissolve effect. No Dissolve noted in Clip Preview (Although a Fade-in, if added is seen) Dissolve noted in Sequence Preview. Place red cursor over the transition area and switch between previews or use dual screen to see what I refer to........ . In this case the Dissolve did NOT export with an avi but the Fade-in did. Definitely something not working correctly. Seems that a transition is associated with a text image in sequence preview but has not been associated with the text image on export. Ordinary jpg images on Track 2 with dissolve seem to work OK. (But my original export with 7.21 did work. Nat

-
Hi Here, using VP 7.21 a text clip placed above the image and having a 2 second Dissolve transition at the end behaves correctly both on the timeline and in an exported .avi file and .mp4 file. However, the project file (vpj file) may not behave exactly as expected when created in an earlier version of VP and imported to a later version of VP. Note also that 7.22 is a Beta version and still being checked out. Being pre-release It is updated frequently and depending on when you download it some features may not yet work correctly. If it's not a huge project can you Save Portable Project as (from the File menu) and upload the folder created to Dropbox or similar. Make it public and someone will take a look. The latest released version of VP is 7.21 so it would be best to use this version to create your project file. Nat
-
Hi Try this... Generate the Clock Title. It will appear on the overlay track. In Sequence Preview when the clock shows 0:00 right click the screen and select Take a Snapshot of Sequence. This will place an image of the screen in the Image bin. This image should show 0:00 Having got an image showing 0:00 place this at the start of the timeline. Set the duration of this 0:00 clip to one second less than the delay required .If you have this on Video Track 1 you can use Storyboard mode to set this. Drag the Clock Title so it immediately follows the 0:00 clip. (or drag your 0:00 image so it immediately precedes the Clock Title) The sequence should play 0:00 for the duration required and then the Clock will start counting seconds. (The One second less for the duration of your 0:00 clip is because the Clock starts at 0 and then counts up so you need to take into account the clock's 0:00 - 1:00 ) Nat
-
Hi Try this... Place the flickering clip on the timeline Click the FX button at the start of the clip Select Auto Levels from the effect option list This should remove random changes in brightness of the frames. I tested this with a "flickered" clip saved as a new clip after using the Old Film effect. The flicker was eliminated. This is as close as you will probably get. Be aware though ......This is not a definitive solution to the problem of flicker as VP will try to auto level dark frames or fades, and blank black frames. In these areas the result will be less than satisfactory. Some years ago the Virtual Dub site carried an anti-flicker add-on. Haven't checked but it may still be available. VP can incorporate VD add-ons. Nat
-
Hi If you have a problem or are not sure how to make something work, why not come here and ask for advice nicely? You will usually get a polite response . I haven't seen your unedited post but I assume there was more of it in a similar vein to the above. Why not try again .........? Nat
-
Hi NCH Useful addition to certain effects would be:- Circular Crop option. Currently only rectangular Circular Mask option. Currently have to fiddle with numerous points to make a circle Circular Crop/Zoom option Currently only rectangular Nat
-

7.21 - Snapshots are taken at the wrong resolution
Nationalsolo replied to Ivan187's topic in VideoPad
Hi That seems to be the case. Reported as a bug. Earlier versions (e.g. VP 7.0) exported the png at the original resolution or the resolution chosen from the list. This may be a result of the recent changes to the preview display settings. Nat -
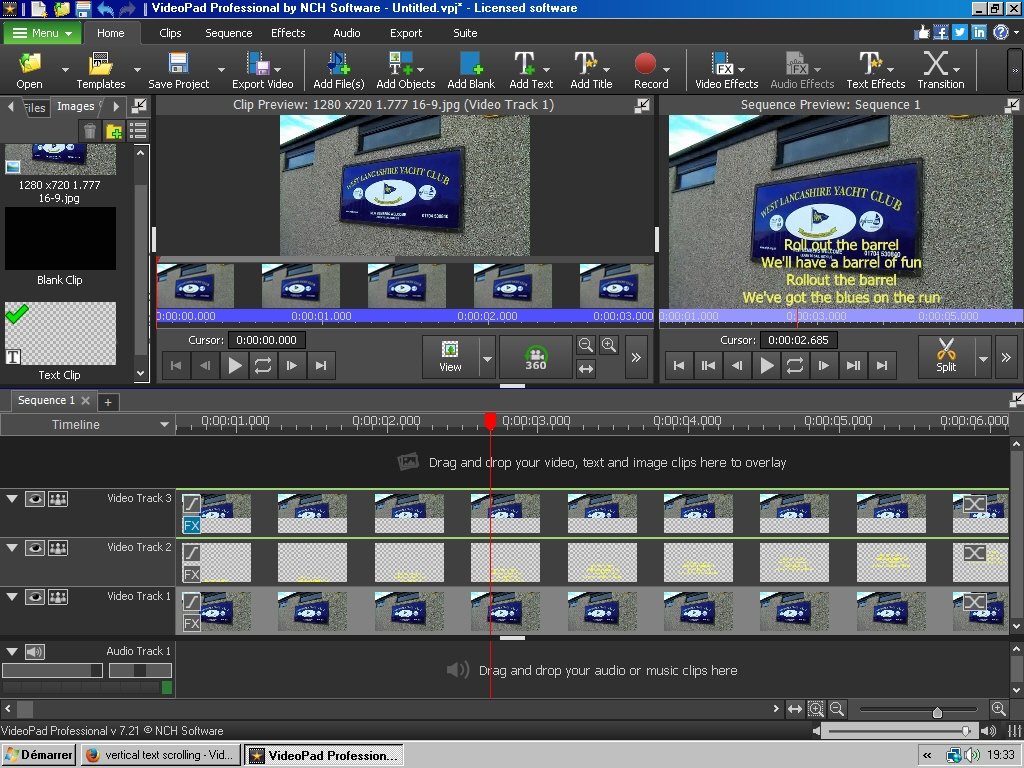
Hi Here is one way you could get scrolling text within a specific window height and position. Worth trying... Switch on dual preview screens in Options/Display as this makes it easier to see what you are doing. Place your background image on Video Track 1 Make the duration the same as all your song In the Text editor, enter just the first four lines of text.Set it central and at the bottom the of the display. Make the font large enough to see (depends on line length but try size 11) and make it of a contrasting colour to the background image. The text image will now be on the overlay track; Video track 2 above the background image. Set Bottom to Top Scrolling Now...the fiddly bit.....(You only need to do this once) Move the cursor line along the track until 4 lines of text are visible at the bottom of the preview. Now add the background image once more to Video track 3 Initially this will cover everything. Now add a Crop effect to this image. Pull up the bottom of the frame until the four lines of text become visible What you have now is an area at the bottom the static image (made of two images) in which your text of four lines can be seen and in which it will scroll up. Now when you play the sequence your text will scroll up through the area at the bottom of the screen, displaying four lines at a time. You can add more text to what you have , or create a fresh text etc. The text will scroll only on the lower area of the whole image to a maximum of four lines. You could create and add a single line of text each time and move it along Track 2 so it synchronizes with the song. If you find that the text scrolling invisibly to the top of the frame behind the top image causes delays you could move Track 3 up to Track 4 and use the empty Track 3 track for another text that overlaps text 1 etc. You will have to explore the possibilities of this idea. The timeline may look a little like this.... Note you may have to monitor the font size if you want more lines Nat

-
Hi No problem. Hope it works OK
-
Hi You didn't save it somewhere? (eg copied to a text file?) I think you can get back from Admin. https://www.nchsoftware.com/videopad/support.html There is a section here for registration problems. Borate may come back in with more details. Nat
-
Hi I generally save versions of VP to my external hard drive as the vpsetup.exe file. I just copy this to the drive along with the registration code. If then at some point I delete the version on my PC (Old Vista machine) I can re-load it and re-install it from the hard drive. The copy remains on the hard drive. Nat
-
Hi VP is a linear editor and the timeline must have a beginning and and an end.. There will be a looping option for the preview screen probably in the next version but this will only be used during editing.. if you want multiple loops of a clip or sequence for an exported video it is simple enough to keep adding the clip to the end of the current timeline the number of times required. You could also create a sequence of a number of clips and repeatedly add this to the time line. Of course, when shown this will only repeat the number of times you have added it. Some external players will often have a looping option anyway which will keep playing the video over and over again until turned off. Nat
-
VIDEO BUT NO AUDIO, FIX IT NOW!!! NEED HELP INSTANTLY!!!
Nationalsolo replied to kems's topic in VideoPad
HI Kems Your project loaded and played just fine here. Are all clips loaded to VP silent..even ones you have exported and found OK in another player.? Still would suggest a complete uninstall and a re-download from the NCH site, not simply a reload from your original .exe file. That shouldn't be a problem if you have your install code.. Nat -
Hi Rick Another method which you might find quicker....... NOTE: This will delete a section on ALL Tracks... With your video clip/s on the timeline.... Right click the dark grey area above the tracks at a point where you want to start the cut (Normally this area is the overlay track but any empty track will do.) Drag the mouse cursor to the right and a blue area over all the tracks will appear. (See below) Release the mouse at the point where you want the cut to end. Right click on a track within the blue area and click the Delete selected Region option that appears..The tracks will rejoin automatically after the deletion. Any joins in the clips deleted are eliminated. Any effects that were added to clips which were cut by the deletion will be retained in the section left on the timeline. The procedure can be repeated as many times as required. Nat

-
Hi There isn't a "Centre Frame" option, in the Crop effect, but you can use the Position effect to place your cropped and zoomed video exactly where you want. So reclick the large green + and add a Position effect. The dotted image rectangle that now comes up in the Clip Preview window can be moved either by dragging. and you can adjust the effect by eye. As this is a bit hit and miss it might be better to adjust the Horizontal (Vertical) sliders (or enter values using the up/down buttons) monitoring the number of chequered squares there are to each side (top and bottom) of the image after each adjustment. They are pretty easy to count and adjustments using the up/down buttons are quite small each time. If all your clips have been cropped and zoomed in the same way you can save your Position effect result as an Effect Chain Template by clicking the blue cassette button along the top of the effects pane. It will then be available to use on other videos treated in the same way in the Templates section of the Effects library. If you have multiple clips on the timeline all requiring the same combination of effects you can, at the outset select them all (Click 1st/SHIFT/Click last.) Use the Video Effects tab on the top toolbar. When you have obtained your centered position click the 7th button along the top of the effects window (Looks like a bit of film with a small green cross) This will Append the effect chain to all other selected clips. Nat
-
Hi As an absolute Newbie........ Place video clip on the timeline Play, or drag thered cursor line to start of unwanted section. Click the Split scissor icon just to the right of the cursor line. Play, or drag the red cursor line to end of unwanted section, Click the Split scissor icon just to the right of the cursor line. If you don't see the Split scissor button..left click the block at the top of the red cursor line.) Repeat for the remainder of the video.....Splitting the track at the Start and End of unwanted segments. Go back to the start of the timeline. For each unwanted segment......Right Click the segment and select Delete Go back to the start of the timeline. For each gap created....Right click the gap and select Close Gap in Track Nat
-
Videos Rendered from Videopad Won't Play Properly
Nationalsolo replied to CoilArchiver's topic in VideoPad
Hi "....What does clearing the cache from Options/disc do?....." The cache contains copies of your indexed project clips which are created as you work. They look similar to this...... In a new editing session, you run the vpj project file that you saved and VP will consult the cache and if the right video files are found for the project it can load the clips and thumbnails to the timeline fairly quickly and one can continue to edit without too much delay. Under normal circumstances these cache files are not deleted and so with every new project you start, the cache gets bigger and can contain hundreds of files. Apart from slowing things down, cache files not related to the project being loaded can also cause problems if they have become corrupted and haven't been cleared. Having loaded your project using the vpj file, clearing unused cache files ensures that only the ones you have loaded to VP are present. Clearing the cache files completely and starting with a clean slate is also not a problem as the vpj project file contains all the data required for rebuilding your work. Providing you still have your clips on the computer in the same folders, your project and the cache are rebuilt. It takes a little longer to do this as the cache is initially empty and the clips have to be reindexed, but when complete, opening your work at a later date will be much faster as the files will now be present in the cache and indexing will not be necessary. Nat
-
Hi netsmith2020 Try here.... http://nch.invisionzone.com/forum/6-wavepad/ Easy done 🙂 Nat
-
Hi Ajaska I think your statements are not necessarily correct and you are, perhaps overreacting to what might be a simple problem as, indeed I think it may be. It's always better if you could explain in simple terms the nature of the difficulty and forum users might be able to point you in the right direction, rather than going off the deep end which might make users reluctant to help you. I glean from your comments that you want a phone video (presumably something like AR 9:16) to be placed in front of a second video of, say AR 16:9 and which will be blurred? The finished effect being something like this....... . If this is the case then the steps are quite simple and are as follows..... Place the background video on Video Track 1 This is the video you want to be blurred. Click the FX at the left end of the track and then the green + button to open a list of effects. Choose the Blur effect and adjust the slider to the desired position. (You can monitor the blur in Clip Preview) Place the sharp phone video on Video Track 2 (The overlay track) and move it to a position on the track so it is above the blurred video on Video Track 1 That is all you require to do.. The GUI will now look something like this...... The sharp phone video will play on top of the blurred background video. (Note it has a black background. This is how transparent areas look on the sequence. In the bin those areas are chequered.) It's always better to ask on the forum if you aren't sure about how to achieve a thing rather than blasting a product because of something you haven't fully grasped. Nat


-
editing all text boxes on the same track at once
Nationalsolo replied to alpenzwalper's topic in VideoPad
Hi Checked with NCH. This behavior ...using Ctrl +A to selct all the clips is a method that selects ALL the clips and tracks on the sequence and is not a bug. So you will have to use Borate's method or SHIFT and CLICK first and Last clip to make the selection. I have suggested that a "Select All Clips" option be added to the Right Click menu that comes up when any track is right clicked. Nat -
editing all text boxes on the same track at once
Nationalsolo replied to alpenzwalper's topic in VideoPad
Hi This is the method that should work... (But see below) Put the mouse cursor on Video Track 2 containing the text and press Ctrl + A. This will highlight all the text clips on the track. (Their background will turn light grey) Click the FX on the first Text clip and select Scale Adjust the Horizontal or Vertical slider (They are linked) until text in the preview screen is size required. Now click the 7th button along the top of the Effect Pane. (It will be highlighted and looks like a piece of film containing a green +) .. (Append effect chain to other selected clips..) The change in scale will be set on all your text clips. .......This should work but I have just noticed a bug here where ALL the tracks on the the timeline get selected and alter in scale not just the clips on Video Track 2. This was noted in the VP 7.20 Beta version. So it may not be relevant to your version so give it a try anyway. PS. Instead of selecting the Text clips using Ctrl +A (which seems to be faulty, Press the SHIFT key down and Click the first text clip followed by the last Text clip keeping SHIFT pressed. This should select all the text clips. Now click the FX on the first clip as from step 2 above. Nat