


Nationalsolo
-
Posts
3,677 -
Joined
-
Last visited
Content Type
Profiles
Forums
Events
Posts posted by Nationalsolo
-
-
Hi Jim
Borate described things pretty clearly.
") Hope things remain OK. Don't hesitate to drop by again if VP reacts unexpectedly or you need some guidance. (Start a new topic though!)
Hope things remain OK. Don't hesitate to drop by again if VP reacts unexpectedly or you need some guidance. (Start a new topic though!) ")
Nat
-
Hi
Nope!.....All the clips have basically the same audio.....ambient sailing sounds with no music or voice. Note clip 1 and clip4 are the same but have a different colour.
Nat
-
Hi
What is the significance of the various colors of the audio waveform?

Nat
-
Hi
- Left click the first clip to select it
- Press the SHIFT key down and left click the last clip. This selects all the clips between the first and last.
- Still with the SHIFT key down right click the last clip again.
- From the menu Group Selected Clips.
- Click the FX box for one of the selected clips.
- Choose required effect (e.g. Crop)
- Adjust the effect in the Clip preview window. Note that as you do this the Chain effect tabs above the effects pane highlight green
-

- Once you have set the parameters click the right hand tab.
- The chosen effect will be applied to all the selected clips.
As Borate says you can click the blue cassette tab and save your custom effect.
Nat
-
Hi
Yes...in a way.
If you want to check each clip place them on separate tracks and line them up.
For a start the top track will be one you will see if you play the sequence. (Higher tracks cover up lower tracks) However each track can be hidden by clicking the button at the left end of the timeline with an icon on it that looks like 3 pawns. Clicking this button hides that particular track showing the one beneath. So hiding the top track will reveal the middle track and hiding the middle track and the top track will show the bottom track. You can split individual tracks with the Scissor icon under the sequence preview window (Not the one associated with the cursor line.)
In this way you can review each track and split out any parts leaving a gap through which the lower track will be seen. It's faffy but that's editing.
Once you are happy with the timeline sequence do an export.
Have a play with this idea and see what you get.
Nat
-
Hi
As noted above, the vpj file is NOT a video file or a video clip. It is a text file containing information about your project.
In short you open VP and add clips/audio/images etc. You can then place these clips on the timeline and edit them, add effects/transitions/texts and titles etc. This is your project.
At some point you may wish to save your work. You do this by invoking the option Save Project. This command will make VP create a vpj file. This file holds the list of clips you have used, their location on your PC and the editing steps you have made to create your project. It is a data file in text format. Using Save Project will overwrite any previous vpj file you made with this command.
If you want to save your project at different points of development use the option Save Project File As. This enables you to enter a specific name and destination and will not overwrite previous vpj files.
VPJ files are not video clips and are designed to be opened by VP. If their icon is double clicked VP will open, read the file, load the clips from their recorded location and assemble the project to the state it was when the project was saved.
Normally this is done quite rapidly as copies of clips and thumbnails are stored in the cache file and can be retrieved fairly quickly. However if the cache has been emptied in the interim, VP has to retrieve the clips from the actual pc locations and this can take much longer since the cache also has to be reloaded. If, as can happen you have moved/deleted or renamed any of the clips/images etc. VP cannot cannot find and load them but it will list the missing items and prompt you to locate them.
Saving you project as a playable video is referred to as Exporting the project. There are numerous options when doing this but the end result is a Video clip.
Don't get mixed up between the vpj file and the exported project.
Are you saying that VP will not open your vpj file?
Nat
-
HI
Not too clear on where you are dragging from or to. Normally you load a clip to VP using Add File(s) and select the clip(s) from a folder. From there they should appear in the clip bin. You can also directly drag a file to the clip bin from the pc folder.
Once in the clip bin you can drag and drop the clip(s) to the timeline or alternatively select one in the bin and add it to various places on the timeline.
Are you saying clips won't appear in the bin or you cannot drag them down to the timeline?
Nat
-
Hi zsuzsa
OK forget the jargon.
It roughly means the audio in your clips can't be decoded by VP and loaded to the timeline as-is looks like this...

This effectively plays as white noise as VP can't correctly read the audio format.
In simple terms the remedy is to convert the clip to a format whose audio VP can recognize. We can keep the original video format (siz/resolution) but alter the audio format. Video converter programs like NCH Prism can do this.
If you find the clips you produce still have the same problem despite Borate's advice and until NCH produce a corrected version of VP do this....
- Download NCH Prism. This is a video file converter
- Save the exe file you get.
- Run the exe file. This will load the demo Prism program to your PC. Note if you have opened VP you can click the Suite tab on the toolbar; select Prism and down load it from there. (Third one along).....
-

- When it opens Click the green + to Add your clip to the list area.
- Enter a destination folder like Desktop or a specific folder.
- For Output format select .mp4
- Enter Encoder Options .............
-

- Now click the Convert button. Prism will convert the clip to mp4 and save it to the selected folder. The audio will have been fixed.
- Open the destination folder and use the converted file.
- The .mp4 file produced will now play OK in VP as shown below.....
-

Hope this helps in the interim.
Couple of other things to note.. Keep the exe file for the demo. When the trial runs out delete Prism from the control panel and if you need it again just re-run the exe file. If you have already got prism running and have a problematic file loaded use the suite toolbar option to automatically open Prism.
Nat
-
Hi
Your original mp4 played OK in VLC but not in VP as (as you have noted) the audio was loud white noise.
The audio format was shown to be PCM-S16BE 48KHz 1536 kbps 2 Channel sound. (16 bit Pulse Code Modulation)
As this doesn't seem to be decoded by VP (yet--see Borate's post above) the work around is to convert the clip to another mp4 1920 x 1080 HQuality H264 clip using Advanced Audio Codec acc Bitrate 128 Sample rate 44100 with 2 Audio Channels. You can probably do this with the NCH Prism app., (although I used a different application.)
This played perfectly in VP and exported OK.
Nat
-
Hi
You won't be able to start a new project while you are exporting. You will be given the choice to either abandon the current export or wait for it to complete........

Nat
-
HI
"....Re...work being lost. When you say you will lose "very little" of your work (??). If I lose any file at all, and have to bring it in again, quite a bit is lost since I have either the audio lined up or the video. I have been saving all along. I will double check what you've suggested as an experiment before trying another project....."
My meaning was that if you didn't do a save immediately before logging out of VP then you would lose all the editing back to the last save you did. So if you had saved regularly prior to logging out you would lose just the small amount of editing done back to the last save. Saving immediately before logging out would mean you lost nothing of your editing. Even a physical crash of VP or an inadvertent loss of power to your PC would mean no loss as VP automatically saves an autosave.vpj.
Not sure why you would lose files though (clips/images/audio etc.) unless you physically moved/deleted/renamed them. Even then, resolving the problem (by relocating/renaming the clips would place them back into the timeline in the correct position as determined by the vpj file you saved.
Nat
-
Hi
As you work on your project save your work regularly. Use the option Save Project File As. Use a name that identifies the stage of your work. This process creates a unique vpj file that does not overwrite any other. (Using Save Project will overwrite previous files.)
Once saved, do not move, delete or rename any of the project files used as you will not be able to reload your work until you have found and replaced them.(Resolved them)
If you Save Project File As regularly you will lose very little of your work and you will be able to reload to any previous stage of development. You will lose none at all if you Save Project File As immediately before you shut down.
Nat
-
Hi
"....Even when recording video/audio at the same time, and a short one and a half minute of it, it doesn't sync audio video at all....."
It does seem that you have a synch problem but I can't reproduce that here with a similar setup.
Using version 8.97 and a simple USB Hercules Blog Webcam with built in microphone I recorded a 2 minute video 800 x 600 at 15fps directly into VP using the Record Option. (Video and audio recorded together)

The main problem I found was during the recording when a delay between tapping and counting and the preview display during the "take" was evident. I am using an old Vista machine so I expect some lag between the VP record screen display (set at full screen) and the audio.
Nevertheless the mp4 that was produced and placed automatically in the clip bin and subsequently loaded to the timeline previewed perfectly and remained exactly in synch from start to finish. Granted that this is not a long test but it would seem to be similar to your description using a Logitec webcam.
The export as an Auto match content mp4 (800 x 600) was set at 15 fps (the default was 10fps variable) and played back in VLC perfectly......no de synch at all.
I then used a silent webcam and a separate microphone to see if that might induce some desynch....

This recorded to VP without any desynch as before and exported perfectly also.

Another shorter test for a minute with the same setup showed EXACT synchronisation between the tapping sound (ruler on a pen point) and the video.......Note cursor line on the audio "tap" and the ruler just touching the pen tip.....

...and two frames later..note the gap between the ruler and pen point and position of red cursor line now....That's pretty exact to my mind.

Where your desynch is coming from but it does seem to originate with your method of recording, your system or some codec or format problem.
Nat
-
Hi Borate
Yes that works without a stepback. I think the problem is that a logical intuitive way would be to...
- Click ADD
- Enter the S/T
- Click ADD and etc.
It would be logical that this would automatically shift the cursor along but it doesn't.
This sequence of steps doesn't move the END marker along so in this scenario S/T are all in the same place. If, however you click the S/T in the list the cursor line does move but that's when you get the stepback fault. It seems a bit unnecessary to have to KNOW that you have to move the cursor along if you want end to end S/T ...It's obvious though (and intuative) to move the cursor along if you want the S/T to be separated on the timeline.
I don't use S/T anyway as I do prefer text entries but if Perry picks up on this with his more exact requirements his problem is solved.
Nat
-
Hi
VP doesn't need to have access to the web as it will run normally without. However Help pages are not part of the software you download but they are available on line by either clicking the ? at the top right of the screen or from the Menu button at the left end of the top toolbar, or, as with many programs by pressing F1.
VP version 8.94. (at least here doing this invokes the following link which directly opens the Help page on line. Obviously you will need to be connected to a server for this feature to function otherwise nothing happens. Depending on your internet browser setting you may be directed to Google first.
i.e. Here (Using Chrome) It goes directly to this page...

VP runs behind this window which can be reduced to the taskbar like any window. Note also that other NCH applications in the Video suite can also be accessed from the Suite toolbar and would require an internet connection to download and install..

Obviously also, a connection to the internet would also be required if you wish to upload directly to F/B Y/T etc .But as mentioned if you are simply going to work within your PC then a connection is not required.
Nat
-
HI
Is this with the updated version of VP or did you change things in your exporting setup? Describe the errors you are getting and, if possible upload the project as Borate describes.
Nat
-
Hi
A 1920 x 1080 image should be a full screen image in the GUI. Check that the preview window is set for Match Content. If you have set it to Match Monitor you may get bars at top and bottom. (Yours at the side though) Check that the offending image doesn't actually have black bars as part of the image......it can still be 1920 x 1080......
Hover over the image in the bin......is it shown without any bars and does it say 1920 x 1080?
Nat
-
Hi
Your observations ARE correct, but in practice (and it's probably just a mathematical anomaly as regards the numerical value shown)) does it make any difference? The second and subsequent S/T follows the first cleanly and I can't see any reason to fiddle with the Show or Hide values . You have said that you require to show the ST one after the other and this does so...
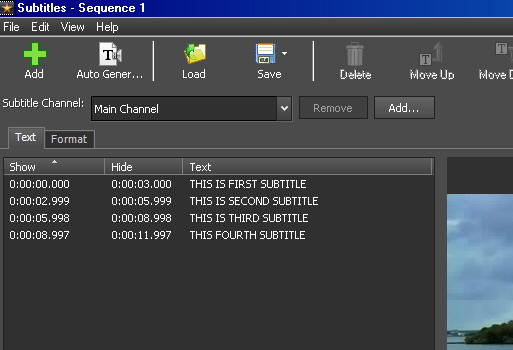 .
.
The stepping back by 0.001 ensure that this happens, so I don't thing it's a bug.
With reference to format, you can set this to apply to all the S/T or just the selected ones. Step back to the list for your selection or addition al S/T by clicking Text. If you click Apply it fixes the list with your format settings and returns to the main VP edit window.
However if you return to the subtitles screen for further entries it seems that the Format has been reset so any S/T you positioned higher will have been moved back down again. I am pretty certain that this may be a bug. I can't think of a workaround apart from suggesting you complete all your subtitles then add your format and finally save an SSA file. Alternatively why not add each subtitle as a simple Add Text ????
Nat
-
Hi
You are setting the Preview playback speed not the actual project speed. The control you used is there just in order for you to see what the speed change would look like. Note it's a control associated only with preview.
Once you have decided how fast or slow you feel looks OK you set the specific clips on the timeline to that % change as Borate describes.
Nat
-
Hi
Check out this forum link. Here it was a case of the user wanting to get rid of an interlacing effect..
https://nch.invisionzone.com/topic/30896-interlace-problem/?tab=comments#comment-81485
read it through you may glean something.
Nat
-
HI
Using an old Vista machine and version 8.94 there is no difficulty here in loading and editing files over 1Gb (1920 x 1080 15 - 20 min copies of Super 8 films.) Obviously not too nifty in caching first time around to an empty cache folder but OK once this is complete.
More details on what you are trying to work with would be useful.
Nat
-
Hi
Set the default still image duration before adding any images to the program. Version 8.94 retains 2 seconds here. Hover over image in the clip bin...what duration time is shown?
If you changed the duration from, say...3 seconds (with images already in the bin even though not used) to 2 seconds, images in the bin will retain 3 seconds and arrive on the timeline with this duration. If, on the other hand you made the change and then added more images, these will take on the new setting.
Nat
-
Hi
Check the VP program volume setting in the PC Mixer control by left clicking the loudspeaker icon bottom right of the computer screen. This may show a lower volume setting than the control shown within the program. If they both show maximum volume use the sound FX Amplify option.
Nat
-
Hi
First Save Project As to ensure you can reload your work to the current point.
Do you still have the problem clip on your PC?
What format is it?
Does it play OK in a separate player like VLC?
If this is the case you have the clip at square 1
i.e. usable.
Open VP and use Options/Disk to empty the cache. You could also check the location of the cache folder (you will find it in Options/Disk). Open the folder and delete all the contents including the sound cache folder.
Now add the clip to VP, either by using Add Files tab or by directly dragging and dropping the clip to the bin area....or even by dragging the clip to the unopened VP shortcut icon.
Once it has been processed play it from the bin in Clip Preview. Does it correctly play in Preview or is there still a bit missing?
If it does play OK drag/drop or place it on the timeline. Wait for the green bar to fully process the clip and check it now plays in Sequence Preview.
If these steps fail, uninstall VP completely from your PC and reinstall from your vpsetup.exe file and try it again.
Nat


 .
.
Text Editor and Video Track question
in VideoPad
Posted
Hi
Once the text has been generated it is automatically placed on a track, usually the overlay track. This can be viewed either.
Usually I find it easier to monitor the text position by setting VP to display both preview panes. Go to Options/Display and tick the box labelled Show dual previews.
Nat